
- - -
- hours mins seconds
to get your checks by
Tuesday, Oct. 6th

 0
0 You have no items in your shopping cart.
How to Order and Print Checks in QuickBooks Online (Step-by-Step)
Printing checks in QuickBooks Online takes three steps: order voucher or standard checks that match its print layouts, run the one-time print setup with an alignment test, then print from the check queue. To print the check register in QuickBooks Online, open your bank account register through the Chart of Accounts, or run the Check Detail report and print that.
That is the whole map. The details below walk through each step in order, including the alignment test that saves you a sheet of real checks, the starting check number rule that keeps your register clean, and the two ways to get a printed record of every check you have written.
Quick Summary: Printing Checks and the Register in QuickBooks Online
- Order the right stock first. QuickBooks Online prints on voucher checks (one check on top, two stubs) or standard 3-per-page checks. It does not print wallet checks.
- Run print setup once. Choose your check style, print the alignment sample on plain paper, and adjust the alignment grid before touching real stock.
- Queue, then print. Mark checks "Print later" as you create them, then print the batch from the Print Checks screen with the correct starting check number.
- Print the register two ways: open the bank register from the Chart of Accounts and use its print and export options, or run the Check Detail report for a cleaner printed list.
- No MICR toner needed. Pre-printed QuickBooks checks arrive with the bank line already printed, so any laser or inkjet printer works.
Before You Print: Order Checks That Match QuickBooks Online
QuickBooks Online supports two check styles, and your stock has to match the one you select in print setup.
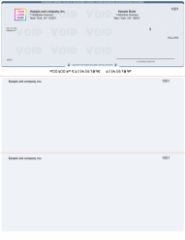
Voucher checks. One check at the top of the page with two stubs below. This is the style payroll and accounts payable teams use, because pay and invoice details print on the stubs.
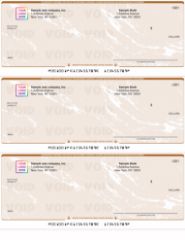
Standard checks. Three checks per page with no stubs, the economical choice for higher-volume vendor runs.
Both styles are available under our QuickBooks checks range, pre-printed with your bank details and MICR line so no special toner is required. If you print in volume, order 3 on a page QuickBooks checks directly.
Two ordering details that matter later: set the starting check number to continue your existing sequence (your last check number plus one), and note that wallet checks are a QuickBooks Desktop format, so QuickBooks Online users should stay with voucher or standard.
Step 1: Set Up Check Printing in QuickBooks Online
Print setup is a one-time job, and doing it on plain paper first is the difference between a clean first run and a wasted sheet of checks.
- Select + New, then Print checks. The first visit opens the print setup flow.
- Choose your check style: voucher or standard, matching the stock you ordered.
- Load plain paper in the printer and print the alignment sample.
- Hold the sample over a real check sheet against the light. The amounts, payee, and date should sit inside their printed boxes.
- If anything is off, use the alignment grid to shift the print position, then re-test on plain paper until it lands.
- Finish setup, and only then load real check stock.
If the print lands in a completely different position rather than slightly off, the check style setting and your stock do not match. A voucher setting will never align on 3-per-page paper, and no grid adjustment can fix that mismatch.
Step 2: Write Checks and Build the Print Queue
Checks reach the printer through the print queue, and the queue fills as you work.
Create a check with + New, then Check. Select the payee, the bank account the check draws on, the expense category from your chart of accounts, and the amount. Before saving, tick Print later. The check saves to the register with a "To Print" label instead of a number and waits in the queue.
Repeat for every payment in the run. Bills you pay through the pay bills flow can join the same queue the same way, so one print run covers the whole batch.
One habit worth keeping: if a payment came in through your bank feed as an expense, it is already paid and does not belong in the check queue. The queue is only for payments that leave your office on paper.
Step 3: Print the Checks
- Go to + New, then Print checks. The queue lists every check marked Print later.
- Select the bank account and confirm the starting check number matches the first physical check loaded in the printer.
- Select the checks to print in this run.
- Load the check stock face up or face down per your printer's feed, using what the alignment test taught you.
- Use Preview and print, check the preview one last time, and print.
- Confirm the result in the dialog that follows. If a check misprinted, tell QuickBooks there was a problem so it stays in the queue for reprinting, and mark the spoiled paper check void in your records.
Once confirmed, each printed check swaps its "To Print" label for its check number in the register, which is exactly what you want your printed register to show.
How to Print the Check Register in QuickBooks Online
The check register is the running record of every check and transaction on a bank account, and there are two practical ways to get it onto paper.
Route 1: Print From the Bank Register
- Go to Transactions (or Bookkeeping), then Chart of accounts.
- Find the bank account and select View register.
- Filter the register by date or transaction type so it shows the period you need.
- Use the register's print or export options: print it directly for a quick paper copy, or export to a spreadsheet when you want to format the columns before printing.
Route 2: Run the Check Detail Report
For a cleaner printed list showing just checks, go to Reports and run the Check Detail report. Set the date range, customize the columns down to date, check number, payee, and amount if you want a simple register-style list, then print or export it. This route usually produces the tidier document for month-end files, audits, or a quick bank-status review.
If your printed register shows "To Print" where check numbers should be, those checks are still sitting in the print queue. Print them, or edit each check to assign its number manually if it was handwritten.
Troubleshooting the Three Common Problems
Alignment drifts off. Reopen print setup and adjust the alignment grid, testing on plain paper. If the drift began after a printer change, redo the alignment for the new printer. A wholesale position mismatch means the check style setting and the stock disagree.
A check printed wrong. Report the problem in the confirmation dialog so the check returns to the queue, void the spoiled paper check, and account for it in your sequence. Never discard a spoiled check without recording it.
A printed check is missing from the register. Check that it was saved to the correct bank account, and that the register filter is not hiding it by date or type. Checks live in the register of the account they draw on.
Keep Stock Ready So the Workflow Never Stalls
The printing workflow only runs as long as there is paper in the drawer. Reorder when your remaining stock covers one pay period, and continue your check number sequence on the new order.
Order before 2:00 PM EST Monday through Friday and replacement QuickBooks checks print and ship the same business day, arriving the next business day with free shipping. And if your business prints from several bank accounts, blank checks with MICR toner let one stock cover every account, a different workflow covered in our blank check stock guide.
About the Author
This guide was written by the Checks Next Day production team, which has printed QuickBooks-compatible business checks for companies across the United States since 1997. The team matches check stock to QuickBooks print settings daily and reviews every guide against current software behavior before publishing.